
We finished the last tutorial Painting old guard part one by applying the sky grey everywhere that the white will end up.
I've just driven for 4 hours to get home and know that i won't have any time this week to do much painting so have decided to do three figures so that i can finish the tutorial hope you enjoy it.
1. Now its time to add the white make, sure that you leave some of the grey showing through it will give depth to the white. On the belts i do long brush strokes either side leaving a bit in the middle and then paint across the belt near the top and bottom or any place the belt meets something else.
Also i have paint the moustache in German camo black (above)
below the moustache has been painted in bubonic brown

2. back pack first coat is in burnt umber

3. first layer of gold is done in shining gold (Citadel)

4. second is done by adding Devlan mud wash (Citadel)

5. third layer is now done by painting all the raised areas in burnished gold (Citadel) sadly this picture doesn't show the effect very well. I don't add the wash to the buttons only larger areas, but I do both the other coats of gold on every thing. Gives a better finish
6. It's time to paint the first layer of the gun this is done inscortched earth (Citadel)
7. also at this time i've paint luftwaffe green 7823 base coat on the water bottle strap

8. Now it's time to paint the wood grain on the gun using Calthan brown (Citadel)

9. I now paint the highlight on the backpack using English uniform it shows up much more defined on the figure than it does in the pictures, paint along the egdes with smooth lines and then a kind of blotch paint the rest in leaving plenty of the first coat.

10. I've painted the water bottle in German camo Medium then later used a mix of sky grey just a very small amount mixed in with english unifrom to do a highlight painting across the bottle to give shadow effect this isn't shown in this picture.

11. first coat of the red now is done by applying black red

12. then i've applied blood red dabbing it around the centre leaving some black red to show through once again this gives depth to the eye.

13. and Bolt gun metal(Citadel) to the gun on the next batch i do i will do a highlight of methal silver later(Citadel)
13a. time for the high light on the moo with Calthan brown (Citadel)

or on this guy Luftwaffe grey then mix white with a Luftwaffe grey for second highlight, remember first coat was German camo black

on this guy i used bleach bone as the second highlight i actually used a bit much on the fella but oh well better luck on the next one. the picture below shows the backpack and water bottle highlight a wee bit better.

14. Now for the highlight on the water bottle strap German camo light green

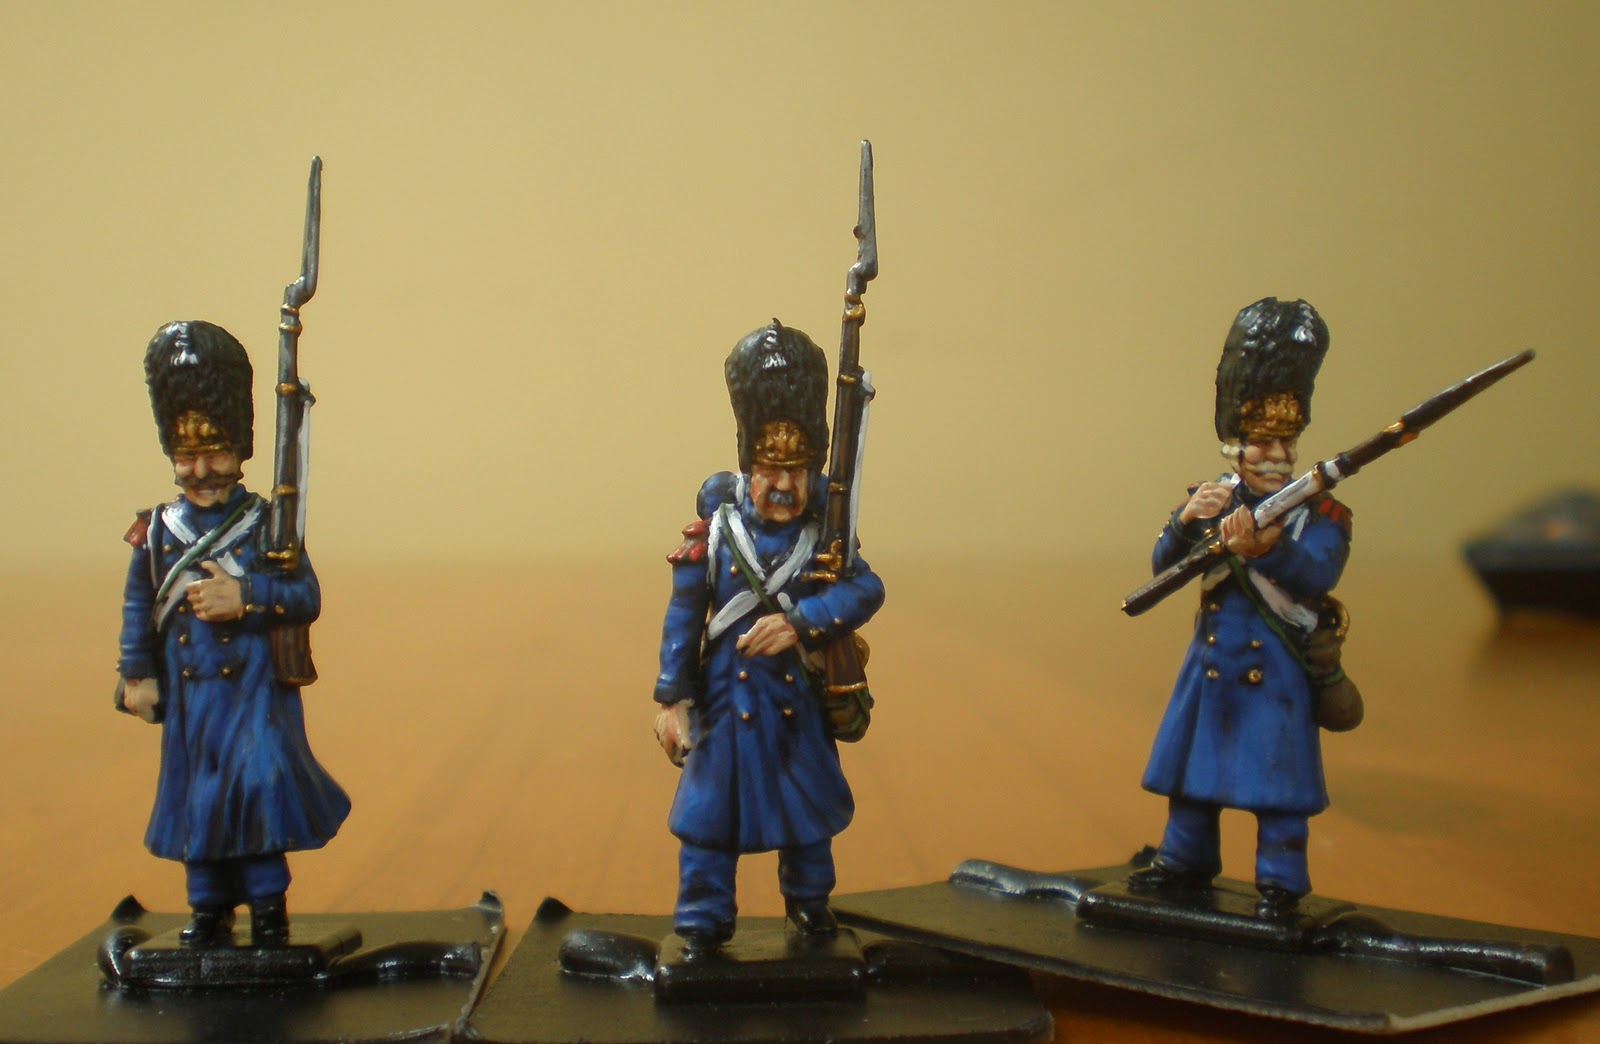
just a different angle on the water bottles

and here they are the three fellas i looked at this afternoon
Suberb work, you got a eye for detail!
ReplyDeleteLooking good.
ReplyDeleteLovely! They are splendid, I love what you did with the faces, very expressive. Do you varnish? I'd be tempted to varnish before doing that lovely gold work.
ReplyDeleteAre you going to paint red piping on the cuffs and collars?
Much better than I could do... :-(
Cheers, Simon
Very impressive painting and tutorial - I think I'll try some of your methods on my next 28mm figures - I usually wait until the very end to add the GW washes but will now try to add them as I go.
ReplyDeleteThanks
Miles
This tutorial is great. Thanks for it.
ReplyDeleteAJ
This tutorial is great. Thanks for it.
ReplyDeleteGreat tutorial, thanks indeed for taking all that time with the photos and then the comments
ReplyDeletethanks guys and yes and no to the vanish i use a clear plastic coat (spay) that comes up glossy then i spray dull coat over top brings it back down to the mat. I was thinking about the cuffs and collars it seems to depend on what books i looked at probably will paint them red.
ReplyDeleteNice work; they certainly look like veterans. Best, Dean
ReplyDeleteGreat tutorial; you are making it look easy!
ReplyDeletethe crazy thing is that if you follow the steps it is and stranger than that it can be really fast
ReplyDeleteGreat tutorial. It's very clear and the steps are simple.
ReplyDeleteThank you for sharing...
ReplyDeleteVery good step by step instructions.
ReplyDelete